
How to Install PV Panel Mounting Brackets for Maximum Efficiency
Table of Contents
Introduction
Installing PV panel mounting brackets efficiently is crucial for the success of any solar energy project. The right mounting system not only ensures the stability and safety of the panels but also helps in reducing installation time and costs. This guide will walk you through the essential steps, tips, and best practices for installing PV panel mounting brackets in the most efficient way possible, whether you’re working on a commercial or residential project. We will also explore how to streamline the process, select the right materials, and avoid common mistakes that can delay the installation process.
Why Efficient PV Panel Mounting Bracket Installation Matters
Efficient installation of PV panel mounting brackets significantly impacts the overall performance and cost-effectiveness of the solar power system. The faster and more precisely the brackets are installed, the quicker the system can be activated, and the sooner the energy savings begin. Additionally, optimizing the installation process reduces labor costs and material waste, ultimately improving the return on investment (ROI) for the project.
Here are some key reasons why efficient mounting bracket installation is essential:
- Reduced Installation Time: Minimizing the time spent on mounting brackets leads to faster project completion.
- Lower Labor Costs: Fewer hours spent on installation mean less manpower and fewer costs.
- Improved Safety: Proper installation reduces the chances of accidents during the setup phase.
- Enhanced Panel Stability: Properly installed brackets ensure panels stay secure, avoiding damage or accidents during high winds or storms.
Key Tools and Materials for Installing PV Panel Mounting Brackets
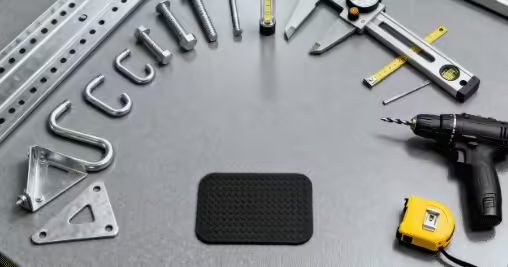
Choosing the right tools and materials is essential to ensure the smooth and efficient installation of PV panel mounting brackets. Here are some of the tools and materials you will need:
Tools Required for Installing PV Panel Mounting Brackets
Measuring Tape
Ensures proper alignment and placement of the mounting brackets.
Power Drill
To drill holes into the roof or structure for securing the brackets.
Wrenches and Socket Set
For tightening bolts and securing brackets.
Leveling Tools
To ensure the brackets are installed at the correct angle.
Screws and Bolts
Strong, corrosion-resistant fasteners are needed for securing the brackets in place.
Safety Gear
Helmets, gloves, and harnesses are essential for working safely at height.
Materials Needed for PV Panel Mounting Bracket Installation
Mounting Brackets
These can be made of materials such as aluminum, steel, or stainless steel, depending on the type of installation and environmental conditions.
Fasteners
Stainless steel or galvanized bolts, nuts, and washers are recommended to prevent rust and corrosion.
Roof Penetration Seals
To prevent leaks when mounting brackets are installed on a roof.
Step-by-Step Guide for Installing PV Panel Mounting Brackets
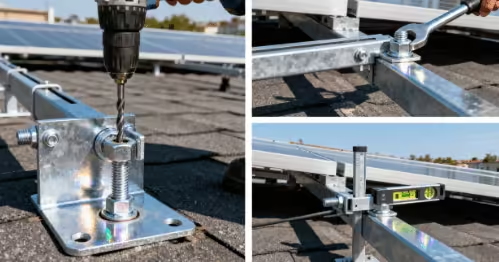
Installing PV panel mounting brackets can be broken down into several steps. These steps will help you avoid mistakes and ensure that the brackets are installed quickly and securely.
Step 1 – Planning the Installation Layout
Before you begin, it is essential to plan your installation layout for maximum efficiency. Begin by considering the following:
- Roof Type and Angle: Determine if your roof is flat or sloped, as this will influence the type of mounting brackets you need.
- Panel Orientation: Panels should face the optimal direction to maximize sun exposure. Make sure you place the brackets in a way that allows for easy panel installation and adjustment.
- Spacing Between Brackets: Plan the spacing between each bracket to ensure optimal stability and support for the panels.
Step 2 – Installing the Mounting Brackets
Once you have your layout planned, follow these steps to install the brackets:
- Measure and Mark Locations: Use your measuring tape to mark the exact locations where the mounting brackets will be installed.
- Drill Holes: Use the power drill to create holes at the marked locations. If you’re installing on a roof, make sure to properly seal around the holes to prevent leaks.
- Attach the Brackets: Secure the mounting brackets in place using the appropriate fasteners, making sure they are level and aligned with your layout.
- Tighten the Fasteners: Use a wrench to tighten all fasteners securely, ensuring the brackets are firmly attached.
Step 3 – Checking the Alignment
After installing the PV panel mounting brackets, it’s crucial to check the alignment. Misalignment can lead to poor panel performance or even damage over time. Use a leveling tool to ensure that each bracket is correctly positioned and aligned.
Optimizing PV Panel Mounting Bracket Installation for Maximum Efficiency
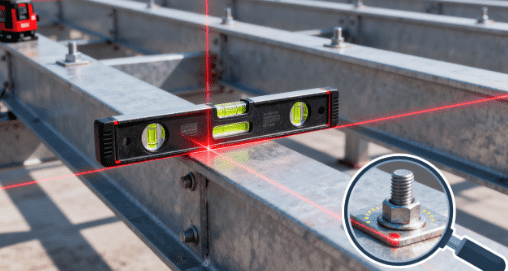
Maximizing the efficiency of PV panel mounting bracket installation is essential for reducing costs and ensuring that the solar panel system is set up correctly. Below are a few strategies to streamline the process:
Pre-Assembly for Faster Installation
Pre-assembling mounting components before the actual installation can save a significant amount of time. By preparing the brackets, fasteners, and other parts ahead of time, you minimize the time spent searching for tools and materials during the installation.
Use of Automated Tools
Using automated tools like power screwdrivers, drills with adjustable speeds, and even robotic systems can further enhance the speed and precision of the installation. Automated systems can reduce human error, improve consistency, and allow for faster assembly.
Avoiding Common Installation Mistakes
Some common mistakes can delay the installation of PV panel mounting brackets and lead to extra costs. These mistakes include:
- Incorrect measurements and misalignment of brackets
- Using the wrong type of fasteners for the roof material
- Not securing the brackets tightly enough, causing potential instability
- Not properly sealing roof penetrations, leading to leaks
Common PV Panel Mounting Bracket Installation Mistakes
| Mistake | Consequence | Solution |
|---|---|---|
| Misaligned brackets | Reduced panel performance | Use laser alignment tools to ensure precision |
| Incorrect fasteners | Corrosion or instability | Choose corrosion-resistant fasteners like stainless steel |
| Poor roof penetration sealing | Roof leaks | Use high-quality seals and follow proper sealing techniques |
| Over-tightening or under-tightening fasteners | Instability or damage to panels | Follow manufacturer instructions for proper torque levels |
Conclusion
Efficiently installing PV panel mounting brackets is critical to ensure a successful solar panel system. By following the proper planning and installation procedures, choosing the right materials, and avoiding common mistakes, you can speed up the process, reduce costs, and enhance the performance of the system. Whether you are installing on a residential roof or a large commercial building, these tips will help you streamline the process and ensure that your solar project is completed on time and within budget.
FAQ
How long does it take to install PV panel mounting brackets?
The time required for installation can vary depending on the size of the project, the type of roof, and the number of panels being installed. Typically, installing mounting brackets for a small to medium-sized system can take between 1 and 2 days.
What materials are best for PV panel mounting brackets?
Aluminum and stainless steel are commonly used for PV panel mounting brackets due to their durability, corrosion resistance, and lightweight properties.
How do I know if my roof is suitable for PV panel mounting?
You need to ensure that the roof is structurally sound, with the ability to support the weight of the panels and brackets. A professional roofer can inspect the roof to ensure it can handle the load.
Do I need to hire a professional to install PV panel mounting brackets?
While it’s possible to install the brackets yourself if you have the right tools and knowledge, hiring a professional installer ensures that the brackets are installed correctly and safely, which can save time and prevent costly mistakes.
What is the most efficient way to install multiple panels?
For larger installations, using pre-assembled mounting systems and automation tools can significantly reduce installation time. Ensuring proper spacing and alignment is also crucial to maximize efficiency.
If you enjoyed this article on Jinbolida’s smart manufacturing solutions and digital factory expertise, don’t forget to join us on social media for more industry insights, updates, and community discussions.
• 📘 Facebook – Connect with us here for the latest on our smart production lines and global impact: https://www.facebook.com/profile.php?id=61577965371544
• 📱 WhatsApp – Feel free to inquire about our customized production line design solutions and high-efficiency equipment at any time: https://wa.me/8613335170705
• ▶️ YouTube – Watch demonstrations of our automated forming, punching, and assembly lines, and explore our applications in Construction and Steel Structure, Photovoltaic and Solar Energy, and more: https://www.youtube.com/@JINBOLIDA-d3c
Let’s keep exploring the boundless possibilities of smart manufacturing, learning, and growing together. Thanks for reading, and see you in the next post! 🚀
 English
  Arabic
  Russian
  Spanish
  French